Introduction
As more and more companies move their environment(s) to the Azure Cloud, the need for a high-available fileserver grows with it. At the time of the migration/installation, a 128GB volume might be sufficient, at some point in time, the volume needs to be increased. But this is not the same procedure as you would do on a on-premise datacenter. In this blog, you will see how to increase the available diskspace for a Clustered Volume, optimizing the available IOPS & throughput of the disks. Expanding the Clustered Volume is a topic for my next blog, coming up later on.
The “Inefficient” way
You can simply add new disks to both fileserver VMs, add the disks to the pool and increase the volume. But this has multiple disadvantages:
-
The amount of data disks for each VM is limited. Depending on your VM size, this can go from 2 up to 32 disks (Azure VM Sizes - General Purpose). But you don’t want to use all your available slots, to keep at least 1-2 free for emergency expanding
-
Depending on the disks you add, you will have a mixture of disk-sizes, but also disk IOPS. For example:
-
- A premium P6 64GB disk has 240 IOPS/disk and a max throughput of 50MB/s.
- A premium P10 128GB disk has 500 IOPS/disk & a max throughput of 100MB/s
- A premium P6 64GB disk has 240 IOPS/disk and a max throughput of 50MB/s.
-
The “Optimal” way
To optimize the new diskspace, you can follow this procedure:
- Add new larger disks to the VMs & add the new disks to the pool
- Put the old disks in “Retired” mode
- Move the data from the old disks to the new disks
- Remove & detach the old disks from the VMs
- The complete script
Important: This procedure can be done during production activity without downtime. But if you want to be 100% certain, you can use the Suspend-ClusterResource & Resume-ClusterResource cmdlets
The procedure
Test setup

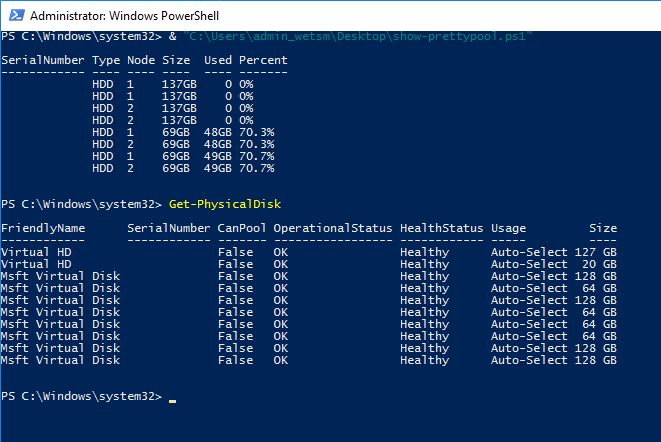
I created a 2-node fileserver setup (MICHA-A-FLS-001 & MICHA-A-FLS-002) , both with 2x 64GB managed disks attached (2x 64GB on each node = 128GB available cluster storage). In the test-setup, I want to extend the current disks to 2x 128GB on each node (resulting in 256GB available cluster storage).
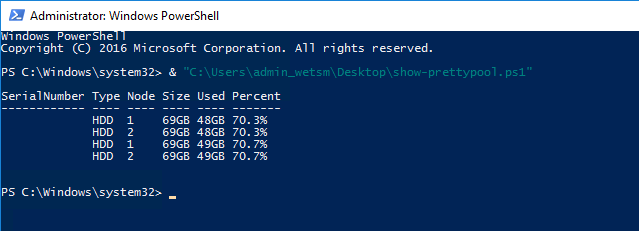
The output from Show-PrettyPool.ps1 (downloadable here):
1. Adding the new disks
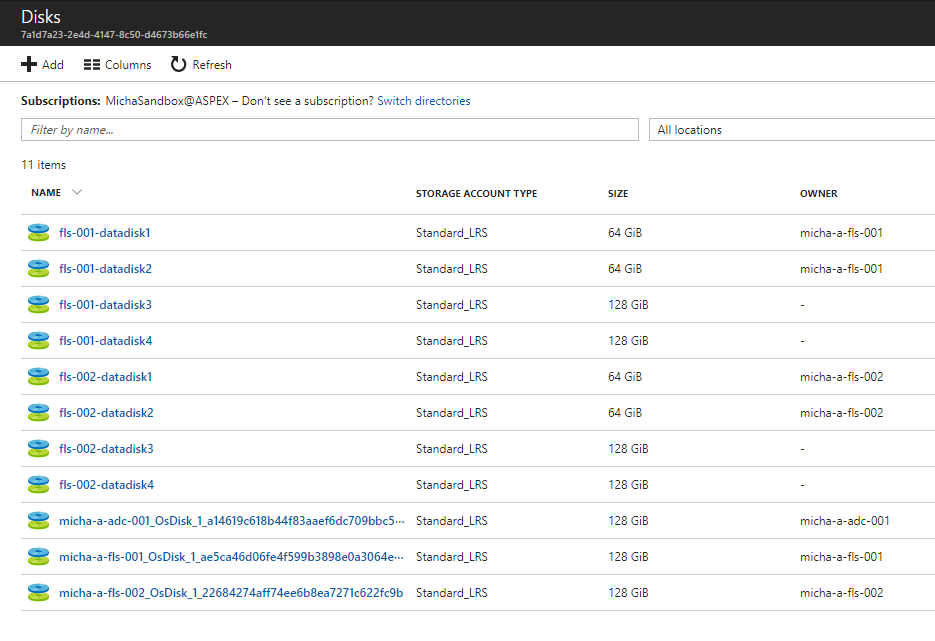
1.1 Creating disks
First, you need to add the new disks to both nodes. When you use Managed Disks in your deployment, you can do this by simply adding disks in the Disks-panel. If you use Unmanaged Disks, you cannot create the disks in advance. You will need to create and attach the disks in the Virtual Machines-panel in the same step (see 1.2 Attaching disks)
So I created 4 disks of 128GB, 2 for each node. 
1.2 Attaching disks
Next step is to attach the disks to the VMs You select the VM in the Virtual Machines-panel, select Disks and click the Add data disk button. 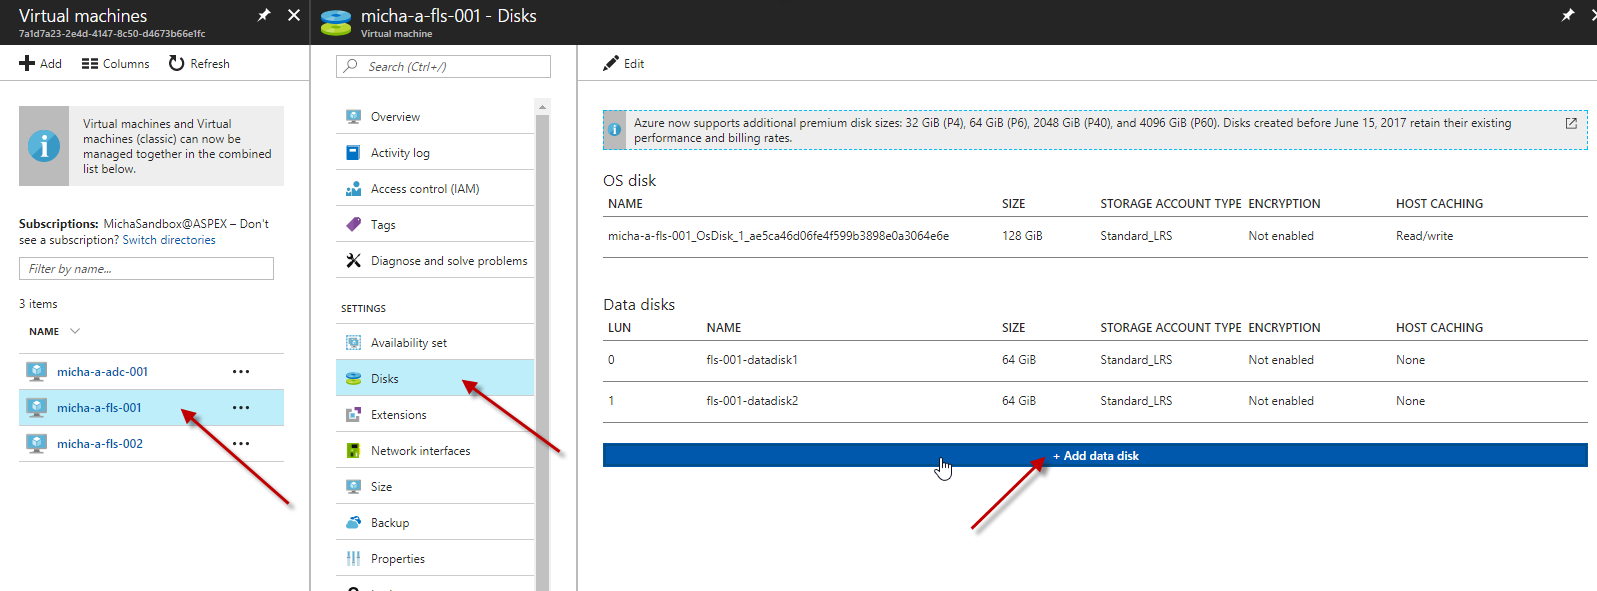
In the drop-down menu, you can select the disks you created in the Disks-panel 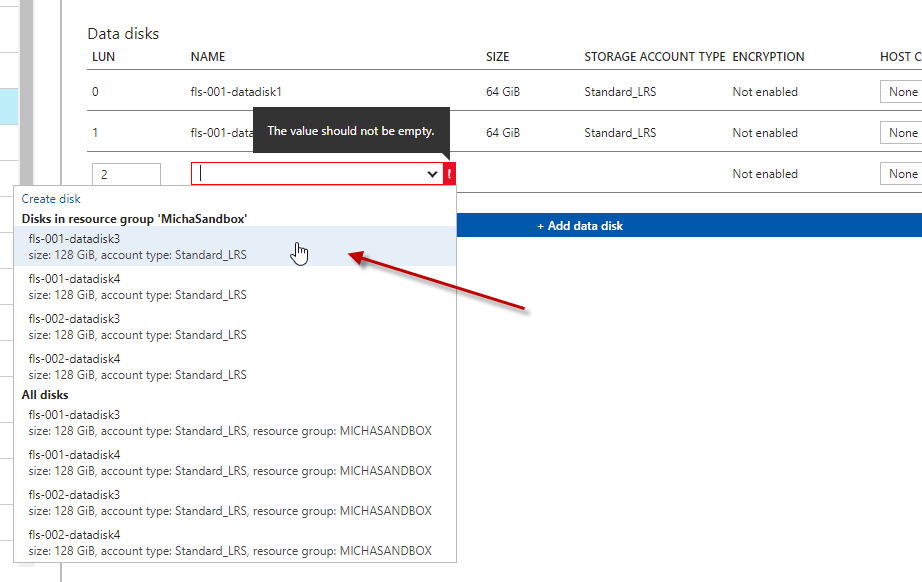
Then you save the configuration. Important to keep in mind: the LUN configuration, because we will need this later on. 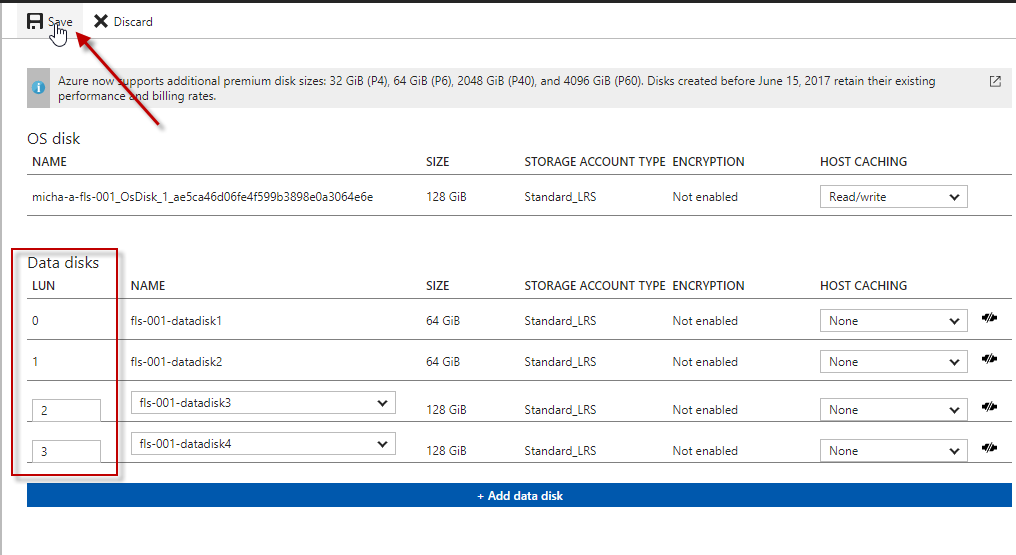
1.3 Adding the new disks to the Storage Pool
When your fileserver environment has only 1 storage pool, the new disks are added to the pool automatically as you add disks to the VMs.
Otherwise you can use the Add-PhysicalDisk cmdlet to add the disks to the storage pool
$PDToAdd = Get-PhysicalDisk -CanPool $True
Add-PhysicalDisk -StoragePoolFriendlyName "Demo Pool" -PhysicalDisks $PDToAdd
2. Put the old disks in “Retired” mode
If you just add the disks to the storage pool, after 30 minutes, Storage Spaces Direct will automatically begin re-balancing the storage pool – moving “slabs” around to even out drive utilization (more information about S2D in this deep dive). This can take some time (many hours) for larger deployments. You can watch its progress using the following cmdlet.
Get-StorageJob
But we don’t want the divide the storage pool to all disks, we want to move the storage pool to the new disks. This can be done by setting the old disks in “Retired”-mode.
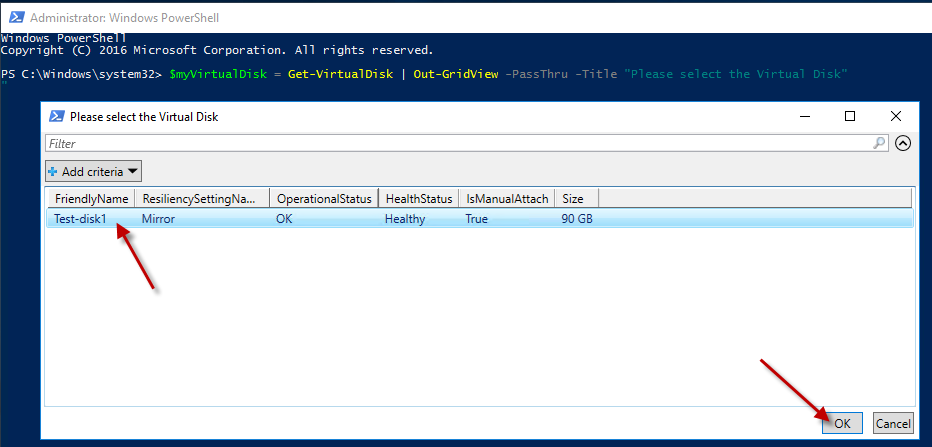
2.1 Select Virtual Disk
First, you need to select the virtual disk to be able to find the storage pool.
$myVirtualDisk = Get-VirtualDisk | Out-GridView -PassThru -Title "Please select the Virtual Disk"
$storagepool = Get-StoragePool -VirtualDisk $myVirtualDisk
2.2 Select the first & second node
Next, you select the 2 nodes from the cluster. This is necessary to select the old disks which will be removed.
$node1 = Get-StorageNode | Out-GridView -PassThru -Title "Please select the first Node"
$node2 = Get-StorageNode | Out-GridView -PassThru -Title "Please select the second Node"
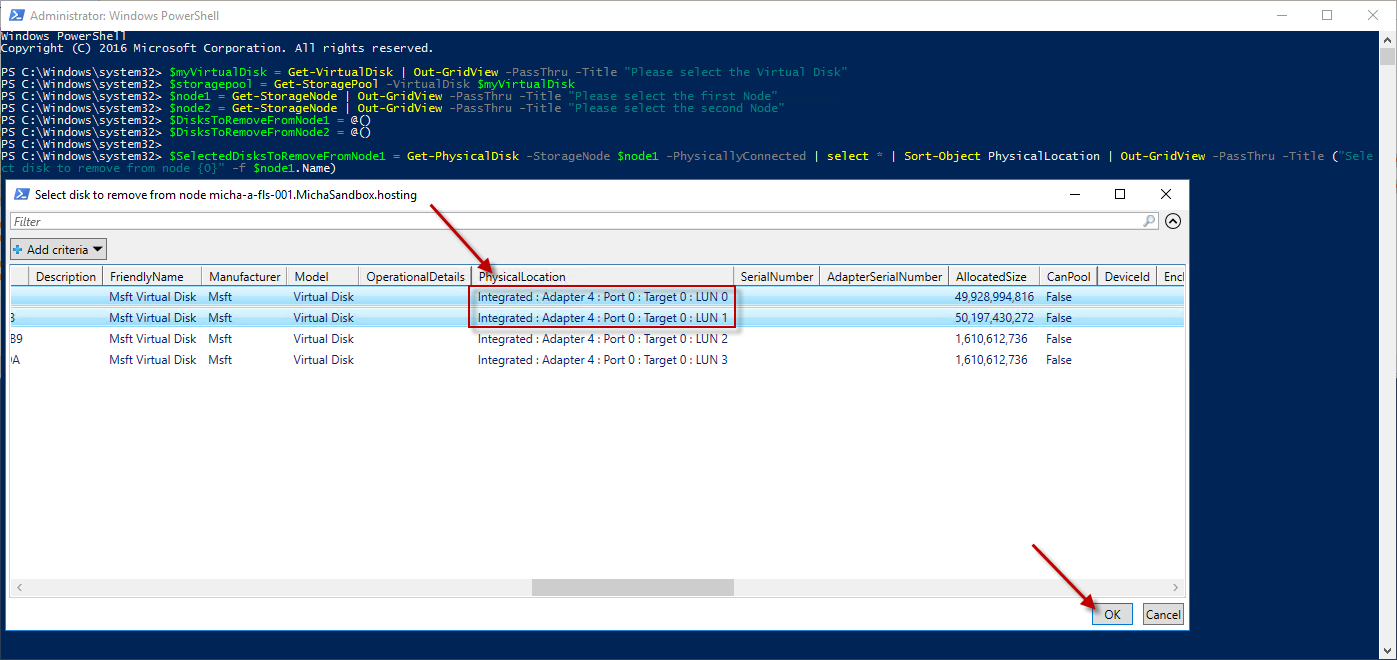
2.3 Selecting the disks which will be removed, based on the LUN-ids
Next, you select the disks which need to be removed, based on the LUN-ids as seen in 1.2 when adding the disks to the VM. Using the code below, you will get a Gridview with all disks from each node. You need to look at the PhysicalLocation, describing the LUNs
$DisksToRemoveFromNode1 = @()
$DisksToRemoveFromNode2 = @()

$SelectedDisksToRemoveFromNode1 = Get-PhysicalDisk -StorageNode $node1 -PhysicallyConnected | select \* | Sort-Object PhysicalLocation | Out-GridView -PassThru -Title ("Select disk to remove from node {0}" -f $node1.Name)
foreach ($selectedDisk in $SelectedDisksToRemoveFromNode1) { $DisksToRemoveFromNode1 += Get-PhysicalDisk -UniqueId $selectedDisk.UniqueId }
$SelectedDisksToRemoveFromNode2 = Get-PhysicalDisk -StorageNode $node2 -PhysicallyConnected | select \* | Sort-Object PhysicalLocation | Out-GridView -PassThru -Title ("Select disk to remove from node {0}" -f $node2.Name)
foreach ($selectedDisk in $SelectedDisksToRemoveFromNode2) { $DisksToRemoveFromNode2 += Get-PhysicalDisk -UniqueId $selectedDisk.UniqueId }
2.4 Old disks in “Retired”-mode
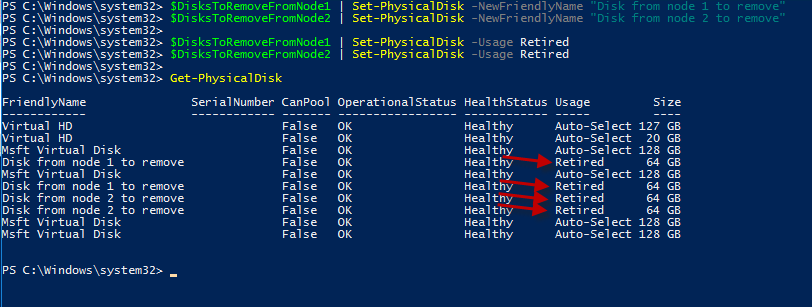
Last step in this phase: setting the old disks in “Retired” mode. This is done by using the Set-PhysicalDisk cmdlet. The code below will also rename the disks for a better overview. Putting the disks in Retired mode will stop the Storage Spaces Direct from re-balancing the storage pool over all available disks.
$DisksToRemoveFromNode1 | Set-PhysicalDisk -NewFriendlyName "Disk from node 1 to remove"
$DisksToRemoveFromNode2 | Set-PhysicalDisk -NewFriendlyName "Disk from node 2 to remove"

$DisksToRemoveFromNode1 | Set-PhysicalDisk -Usage Retired
$DisksToRemoveFromNode2 | Set-PhysicalDisk -Usage Retired
3. Move data to the new disks
3.1 Start the Repair-VirtualDisk cmdlet
Now the old disks are in Retired mode, we can request the S2D to start repairing the virtual disk, by moving the data from the old disks to the new disks. This is done by using the Repair-VirtualDisk cmdlet. This can take some time (many hours) for larger deployments, therefor we start the Repair-VritualDisk cmdlet as a job You can watch its progress using the Get-StorageJob cmdlet.
$myVirtualDisk | Repair-VirtualDisk -AsJob

Get-StorageJob

3.2 Follow up the Storage Job
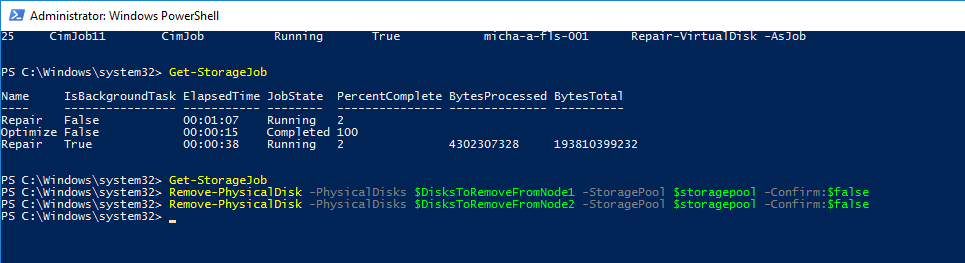
Upon completion, the Get-StorageJob cmdlet will return a Completed overview, or will just return a null value (after a few minutes, the job-log is cleared) 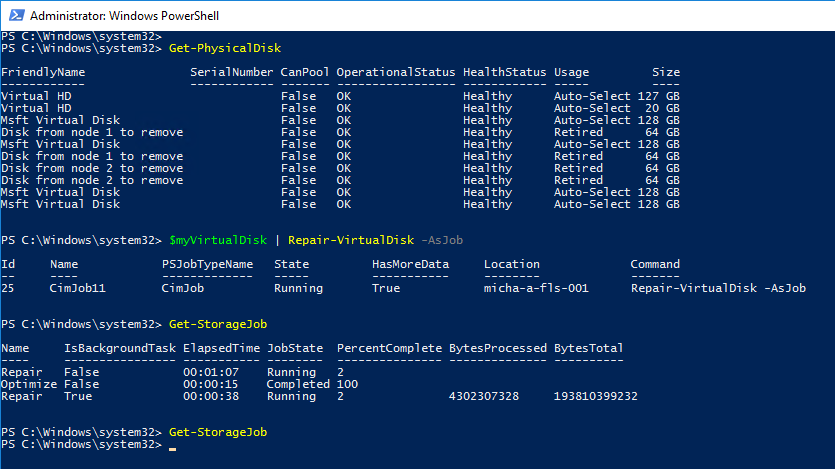
3.3 Repair completed, overview of the Disks
When the Repair job is complete, using the Show-PrettyPool.ps1, you will see that the old disks are empty. The new disks are filled up, and the data is divided evenly across the new disks. (first run was before the Repair, the second run is after the Repair job) 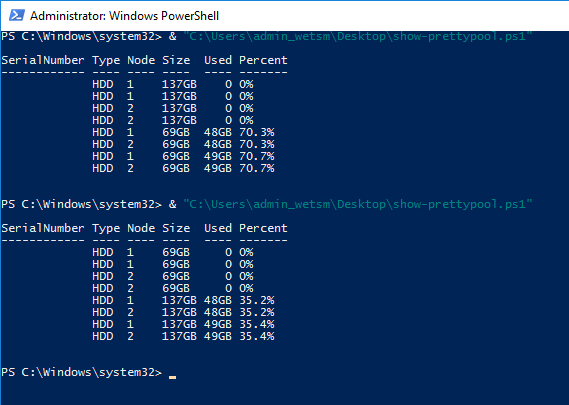
4. Remove & detach old disks
4.1 Remove from the storage pool
First step in this last phase is removing the disks from the storage pool. Because the old disks are still in the variables, you can simply pipe them into the Remove-PhysicalDisk cmdlet.
Remove-PhysicalDisk -PhysicalDisks $DisksToRemoveFromNode1 -StoragePool $storagepool -Confirm:$false
Remove-PhysicalDisk -PhysicalDisks $DisksToRemoveFromNode2 -StoragePool $storagepool -Confirm:$false
Using the Show-PrettyPool.ps1, you will see that the old disks are no longer part of the storage pool 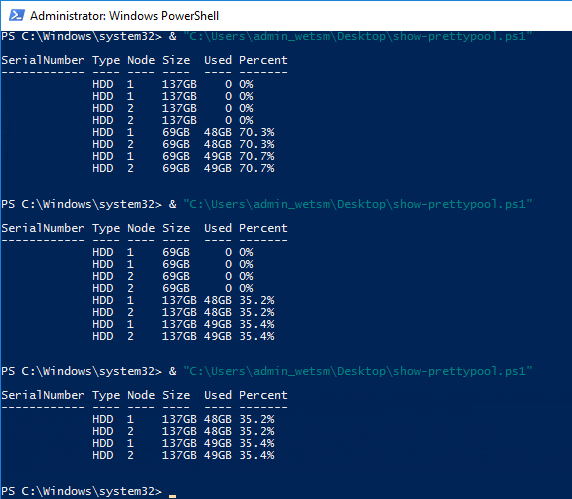
4.2 Detach from VM
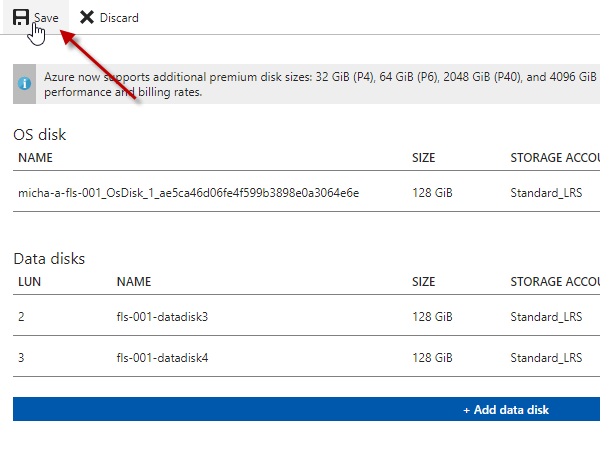
Next step is detaching the old disks from the VMs. You select the VM in the Virtual Machines-pane, select Disks and click the Edit button 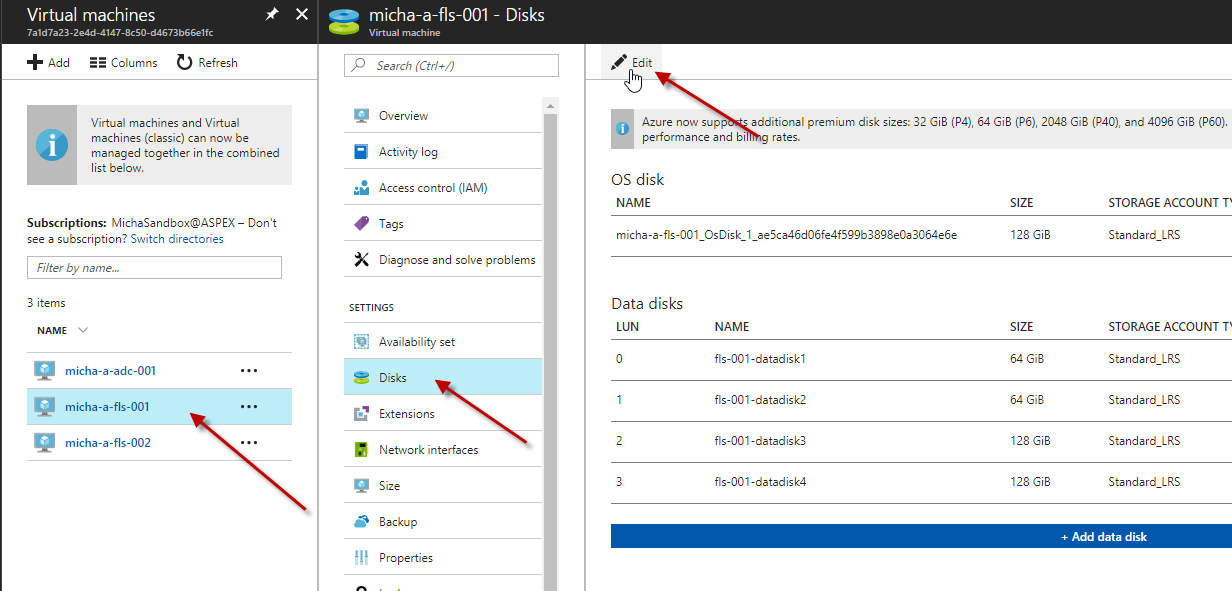
On the right side, you click on the Detach button next to each old disk and click the Save button. 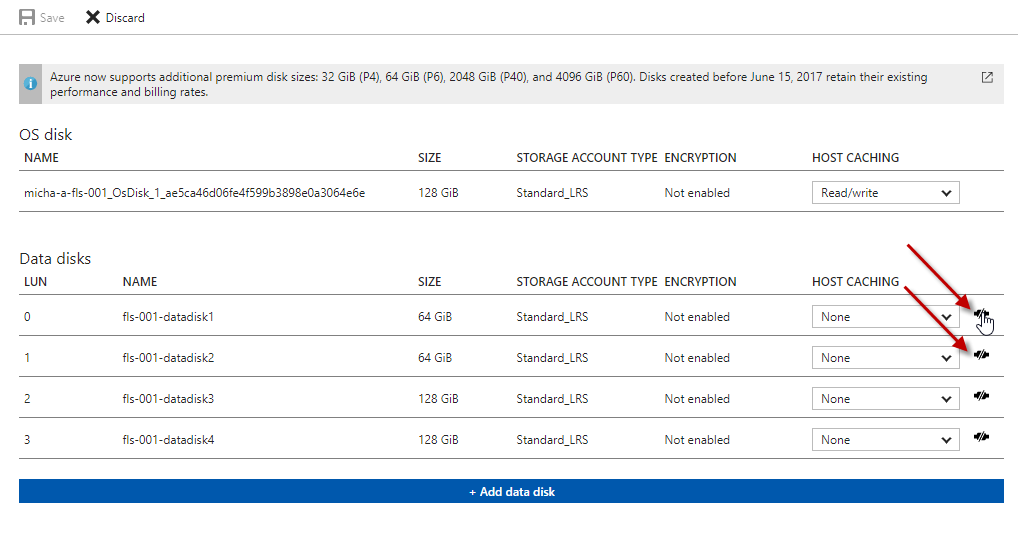
In the VM, when you execute the Get-PhysicalDisk cmdlet, you will see that only the new disks are connected. 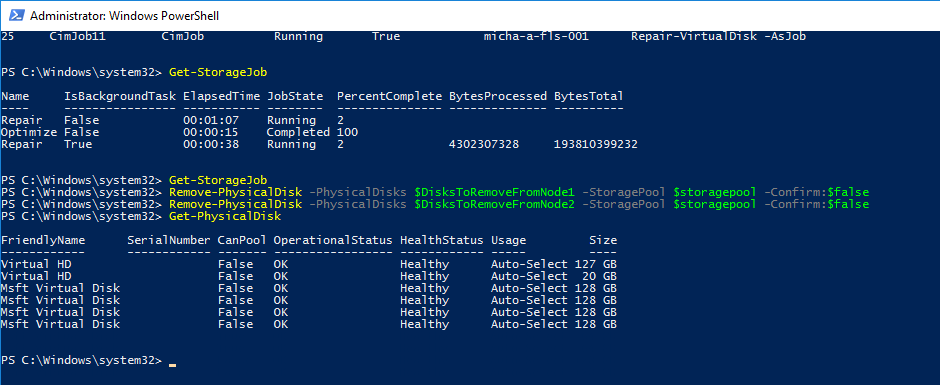
4.3 Remove Disks
The very last, but important, step to do is removing the disks permanently. If you forget to do this, you will keep on paying for the disks, even though they are not connected.
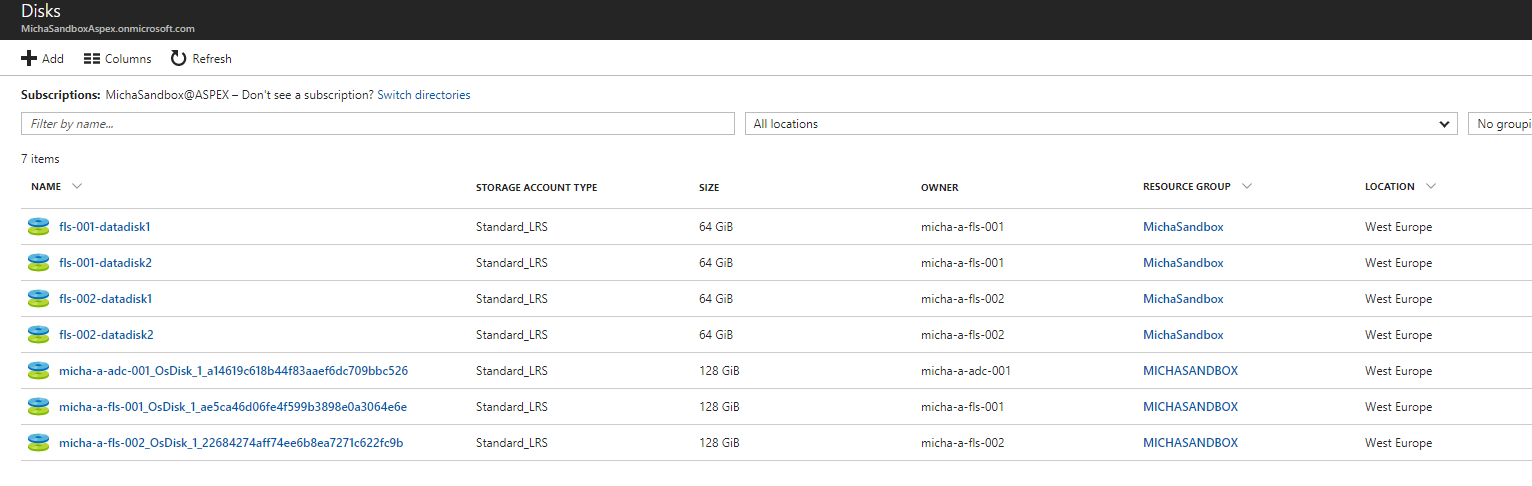
4.3.1 Managed Disks
For Managed Disks, you go the Disks-panel. There you will see the old disks, with no Owner assigned to it. 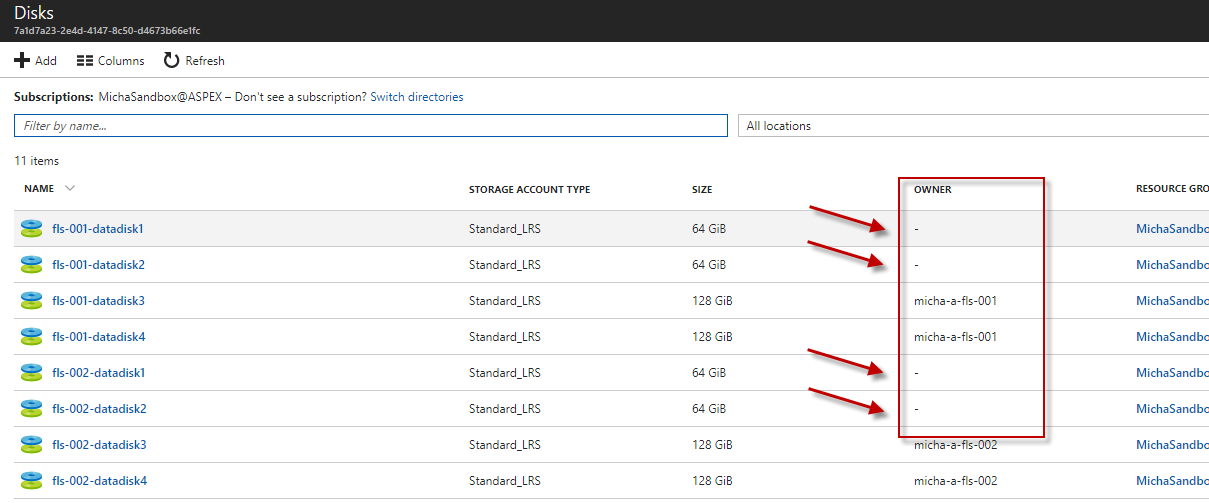
You click on an old disk, check the DiskState (should be Unattached) and click Delete. And this should be done for all old disks. 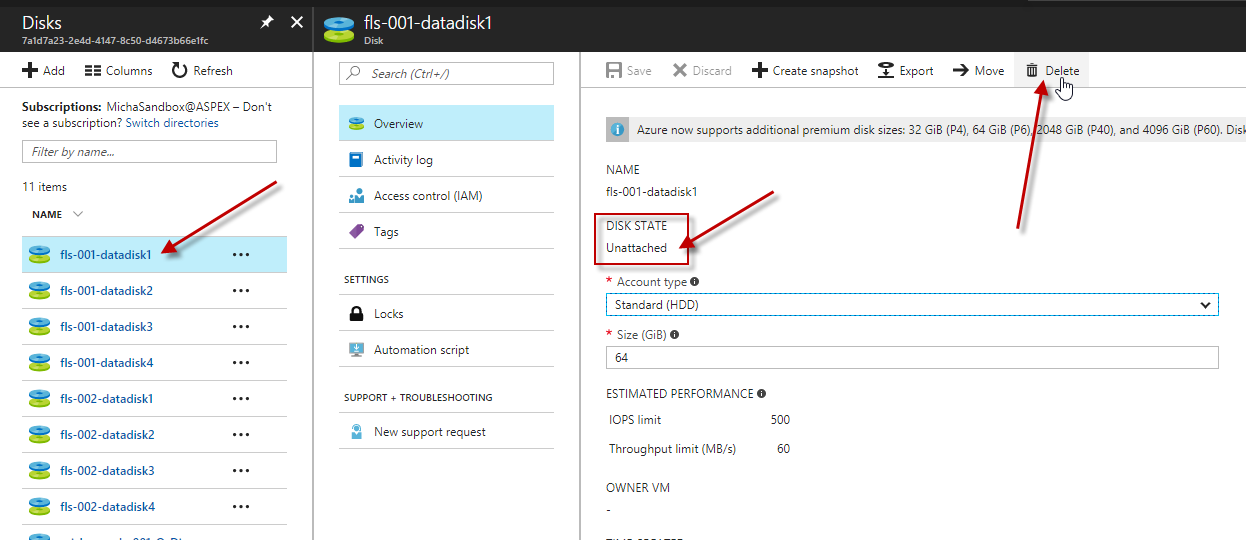
4.3.2 Unmanaged Disks
For Unmanaged Disks, you go to the Storage Accounts-panel and select the Storage Account where the VHD is stored. In the Overview, you select the Container containing the VHD. 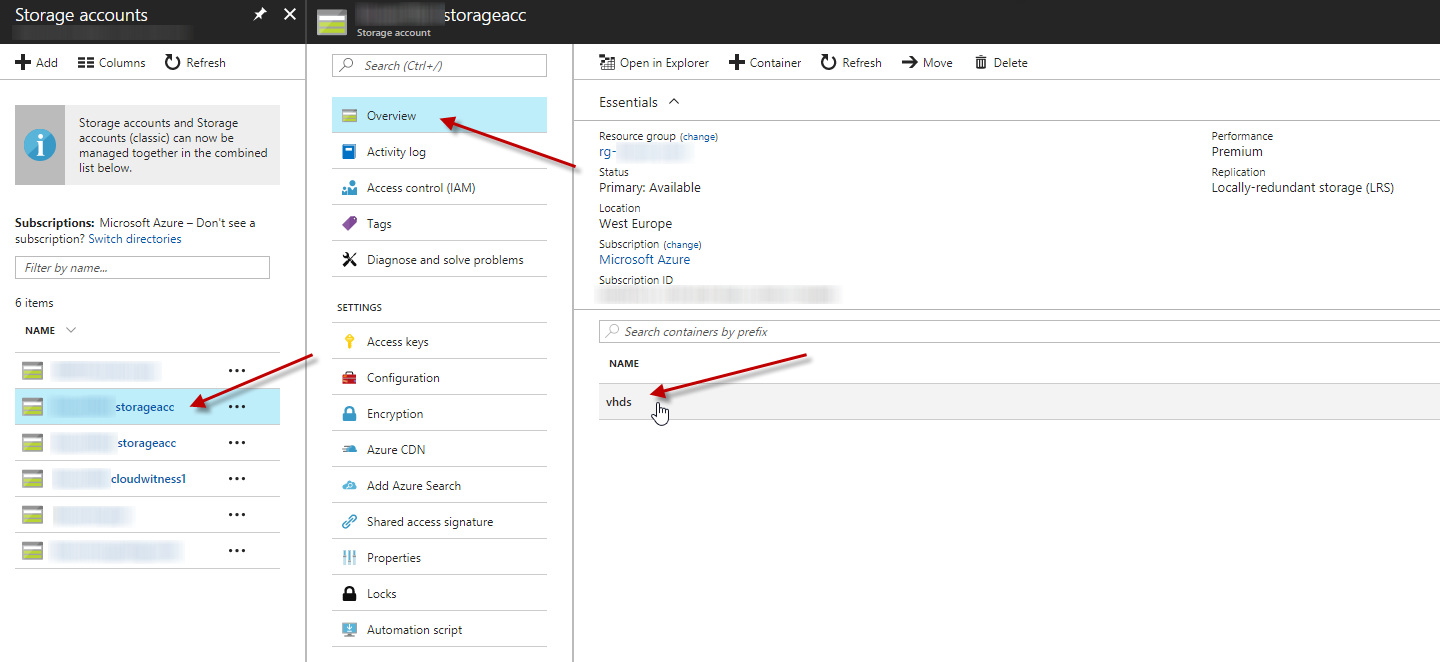
Next, you select the VHD-file, and on the right panel, you check the Lease Status (should be Unlocked), then you click on Delete. 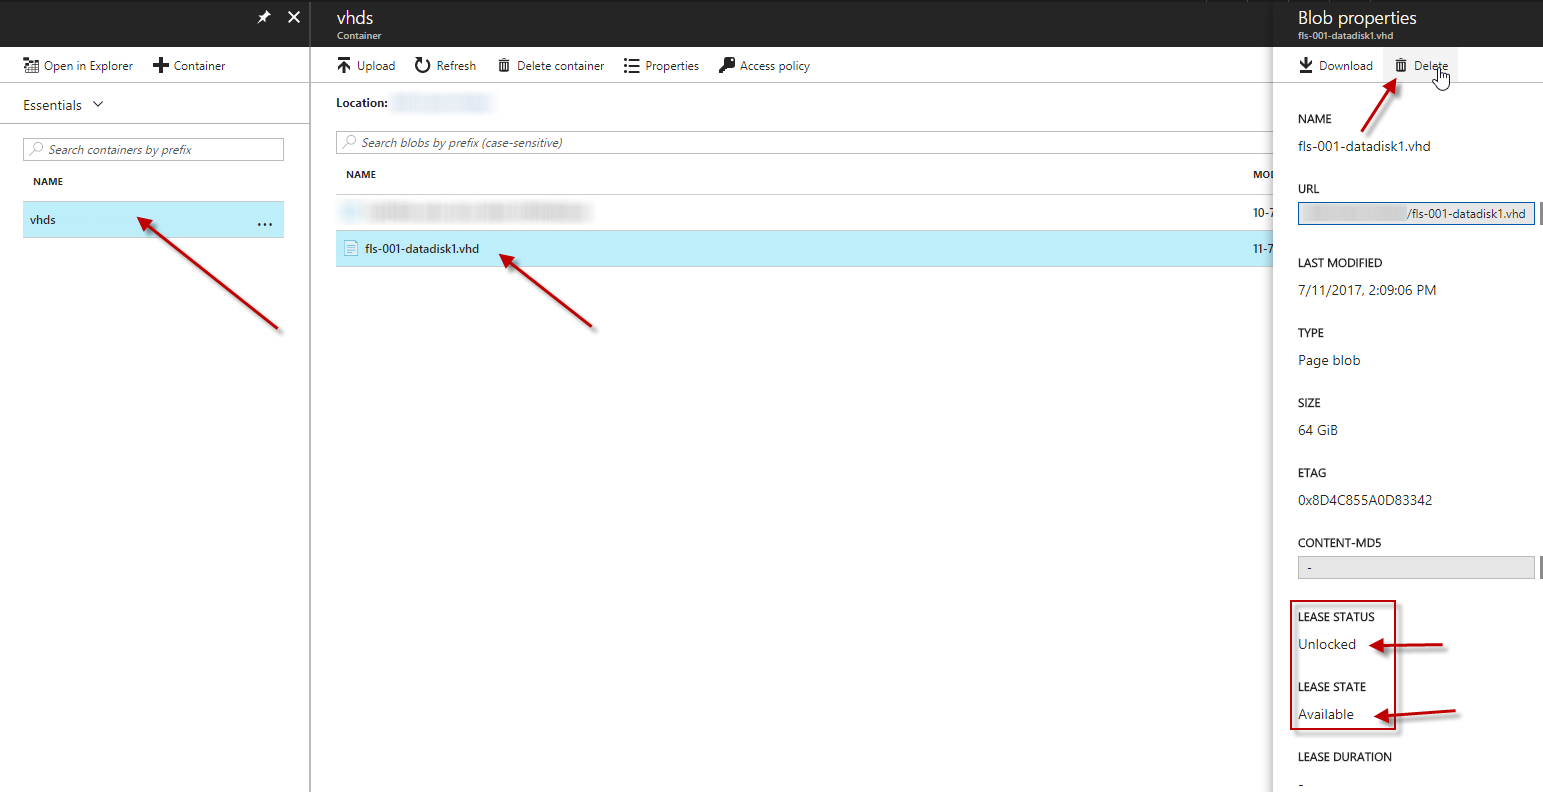
And thats it, your cluster has now extra diskspace to expand the volume. Expanding the Clustered Volume is a topic for my next blog, coming up later on.
5. Complete script
$myVirtualDisk = Get-VirtualDisk | Out-GridView -PassThru -Title "Please select the Virtual Disk"

$storagepool = Get-StoragePool -VirtualDisk $myVirtualDisk

$node1 = Get-StorageNode | Out-GridView -PassThru -Title "Please select the first Node"
$node2 = Get-StorageNode | Out-GridView -PassThru -Title "Please select the second Node"

$DisksToRemoveFromNode1 = @()
$DisksToRemoveFromNode2 = @()

$SelectedDisksToRemoveFromNode1 = Get-PhysicalDisk -StorageNode $node1 -PhysicallyConnected | select \* | Sort-Object PhysicalLocation | Out-GridView -PassThru -Title ("Select disk to remove from node {0}" -f $node1.Name)
foreach ($selectedDisk in $SelectedDisksToRemoveFromNode1) { $DisksToRemoveFromNode1 += Get-PhysicalDisk -UniqueId $selectedDisk.UniqueId }
$SelectedDisksToRemoveFromNode2 = Get-PhysicalDisk -StorageNode $node2 -PhysicallyConnected | select \* | Sort-Object PhysicalLocation | Out-GridView -PassThru -Title ("Select disk to remove from node {0}" -f $node2.Name)
foreach ($selectedDisk in $SelectedDisksToRemoveFromNode2) { $DisksToRemoveFromNode2 += Get-PhysicalDisk -UniqueId $selectedDisk.UniqueId }

$DisksToRemoveFromNode1 | Set-PhysicalDisk -NewFriendlyName "Disk from node 1 to remove"
$DisksToRemoveFromNode2 | Set-PhysicalDisk -NewFriendlyName "Disk from node 2 to remove"

$DisksToRemoveFromNode1 | Set-PhysicalDisk -Usage Retired
$DisksToRemoveFromNode2 | Set-PhysicalDisk -Usage Retired

$myVirtualDisk | Repair-VirtualDisk -AsJob

Get-StorageJob

Remove-PhysicalDisk -PhysicalDisks $DisksToRemoveFromNode1 -StoragePool $storagepool -Confirm:$false
Remove-PhysicalDisk -PhysicalDisks $DisksToRemoveFromNode2 -StoragePool $storagepool -Confirm:$false